NFC Tags – first experience

So, i’m a google cardboard user, and I have been using my own created cardboard using an amazon box and the downloaded designs. I bought the lenses through an online company – unofficial google cardboard one, and, when i put my phone into cardboard, i have to activate the app first then install.


I know the official one has NFC tags, and although i know of these, i havnt actually used them.

Until now…

This morning i have received 8 tags i bought through eBay at the cost of just under £3, which are the Smartrac Bullseye 320_2 versions (http://www.nfctags.com/smartrac-bullseye-nfc-ntag)

I am going to install one into my cardboard so i dont have to activate each time i go to put it in.

Also i can do things like phone on scilent when on bedside table yada yada, maybe to automate sending a morning text to my partner when i get to work – not that she will like this, and this has already been done with a ‘automated random text generator’ – with  bad results haha, but yeah maybe not that!

So, first thing first is we need a NFC writter/trigger program. This is a program which allows you to read NFC tags and to then add an action to the triggering tag.


The first thing i did was to install NFC writer by Egomotion group (https://play.google.com/store/apps/details?id=com.tagstand.writer&hl=en I also installed Trigger, by the same company. https://play.google.com/store/apps/details?id=com.jwsoft.nfcactionlauncher&hl=en

Trigger allows you to asign an action to a tag, where as NFC writer allows you to write something /blog post, location marker foursquare etc automatically by tagging in.

I wanted to test this, so i used Trigger to open a web page to www.roboteernat.co.uk when it was placed on the tag – working well!

Secondly i have asigned a tag which i have stuck onto Cardboard, to triger the cardboard app.

So far so good!


Now thinking about what else to tag… Work desk, Bedside table, Hackspace check in…


Arduino window comparitor

Scenario:

Heater needs to turn on until boiler reaches maximum temperature, then turns off until a lower temperature is reached, then turns on until maximum, then off until minimum… and so on.

Imagine hysteresis at set upper and lower limits, for the heater to run at.

Arduino connected to thermistor to measure temperature, with SSR connected to heater mains circuit to turn on/off heater.


A simple comparitor code for arduino allows us to set the max and min limits of temperature (mapped to values 0-100) (temperature in celcius is not required for this task, tho could be usefull – may add later)

LED provides visual feedback of SSR on (the SSR on could have LED on expensive units)

CIRCUIT DIAGRAM TO COME – as is code formatting in wordpress \o/

CODE:
/*
thermistor Input
Measures temperature of thermistor and turns on heater SSR when temperature is in window
turning on and off a light emitting diode(LED) and SSR to maintain temperature.
The SSR heater will be turned on if below heaterHighVal and off when passes window to heaterLowVal.
These values are analogue values obtained by analogRead().

The circuit:
* Thermistor attached to analog input 0
* heaterPin connected to input of SSR – SSR through Live to heater
* LED anode (long leg) attached to digital output 13
* LED cathode (short leg) attached to ground

* Note: because most Arduinos have a built-in LED attached
to pin 13 on the board, the LED is optional.

Created by Nathaniel Poate
30 May 2013
*/

int sensorPin = A0;        // select the input pin for the thermistor
int ledPin = 13;           // select the pin for the LED
int heaterPin = 10;        // select the pin for the heater SSR
int heaterLowVal = 20;    // select the value for low temperature cutoff window
int heaterHighVal = 50;   // select the value for high temperature cutoff window
int sensorValue = 0;       // variable to store the value coming from the thermistor

void setup() {
// declare the ledPin and heaterPin as an OUTPUT:
pinMode(ledPin, OUTPUT);
pinMode(heaterPin, OUTPUT);
}

void loop() {
// read the value from the sensor:
sensorValue = analogRead(sensorPin);
int temp0to100 = map(sensorValue, 0, 1056, 0, 100);

if (temp0to100 >= heaterLowVal && temp0to100 <= heaterHighVal)
{
heaterOn;// turn Turn on heater
}
else if (temp0to100 <= heaterLowVal && temp0to100 <=heaterHighVal)
{
heaterOn;
// turn Turn on heater
}
else if (temp0to100 > heaterHighVal)
{
while (temp0to100 >= heaterLowVal)
{
heaterOff;
// turn Turn off heater
}
}
}

void heaterOn() {
digitalWrite(heaterPin, HIGH);
digitalWrite(ledPin, HIGH);
// turn on heater and LED
}

void heaterOff() {
digitalWrite(heaterPin, LOW);
digitalWrite(ledPin, LOW);
// turn on heater and LED
}

Admesh program to fix broken STL files

I attempted to open the tantillus stl file for top corner front left but sadly it failed in lic3r saying it had no slices or something, and Bill20r3 and teepee on IRC #Reprap explained about Admesh program.

A commad bassed programme, it fixes / translates rotates etc stl files.

to download:
bill20r3> admesh seems to have fixed it just fine, fwiw.
admesh?
admesh is an open source program for repairing, translating and processing STL meshes. It’s very fast and almost as old as 3D printing. https://sites.google.com/a/varlog.com/www/admesh-htm

if this is down due to server issues go to:
http://ftp.de.debian.org/debian/pool/main/a/admesh/
and download
admesh_0.95.orig.tar.gz 12-Oct-1998 20:52 50K file.

Roboteernat: bottom of the page https://sites.google.com/a/varlog.com/www/admesh-htm – the small arrow pointing down

download the file and save to desktop.

open command prompt window and change directory to point to admesh folder

save the broken stl file needed t be fixed ithin the admesh folder and confirm it id there by using cmd window and typing 'dir' to list the files in the directory

Once it is there, we can fx it.

Type

admesh --write-binary-stl=file_admesh.stl file.stl

where file_admesh.stl is the file output name
and file.stl is the name of the file to be fixed

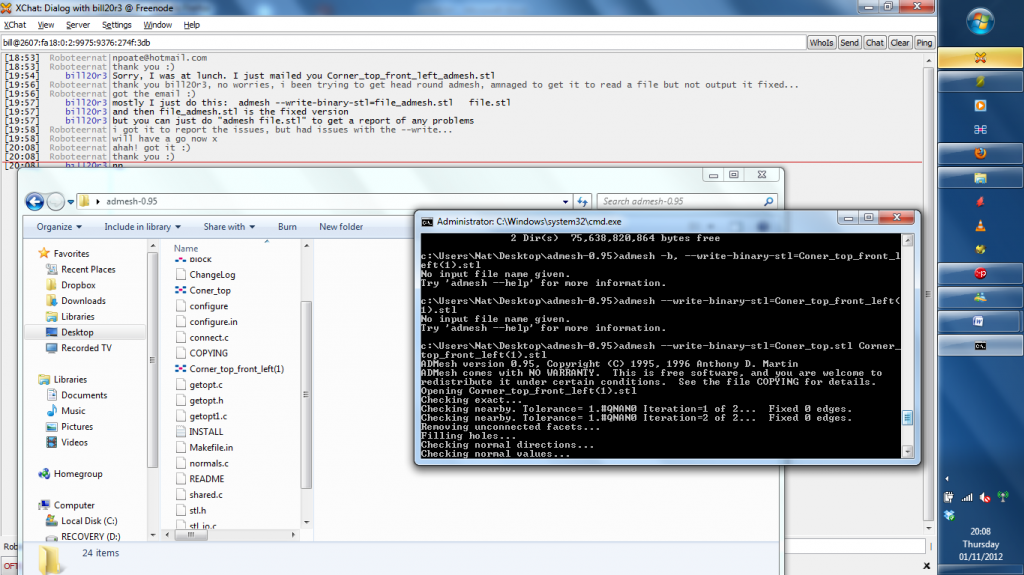
Here is an example print screened for the future 🙂

the file ‘Corner_top_front_left(1).stl has been fixed and saved as Top_corner.stl in the admesh folder.

All slicing fine now 😀